Tuesday, May 31, 2011

Chocolate Chunk Cookies for someone special

I promised a friend of ours, a batch of his favorite cookies as soon as his diet would allow & he request came for this weekend. I was thrilled to oblige!  These have more of a chocolate wallop than my Chocolate Chip Cookies. And they are so good! If only they acted as a yummy medicine that cured everything. I just hope they made him smile!

Make these the next time you have a chocolate craving.


Lishie's Chocolate Chunk Cookies
  • 1/2 cup sugar
  • 1 cup dark brown sugar, packed 
  • 2 sticks butter
  • 2 eggs
  • 1 tsp vanilla 
  • 2 & 1/2 cups AP flour
  • 1 tsp baking soda
  • 1/4 tsp salt
  • 2, 4 oz. Semi-Sweet Chocolate bking bars (I use Ghirardhelli), broken into uneven chunks.

Preheat oven to  300°.

Mix together the 2 sugars until combined. Add the butter & mix on medium speed until blended & fluffy. Add eggs & vanilla & beat until well incorporated. 

Sift together flour, baking soda & salt in a separate, smaller bowl. Add slowly to the butter/sugar/egg mixture until incorporated. Do not over-mix!

Fold in the chocolate chips with a spatula.

Drop rounded tablespoons of the batter on greased cookie sheets (or silpats). Bake 20-22 minutes or until the cookies are light, golden brown. 

Cool on baking racks (but make sure you eat a couple warm & gooey out of the oven!!!) Makes 3 dozen (give or take a couple of extra gooey ones that "go missing".)


*Lishie Tips- Make sure your butter & eggs are at room temperature! I crack each egg separately into a small bowl, before adding to the batter.  Sift all of the dry ingredients together! Remember the chip/flour tipLeave about a TBsp of the flour mixture in it's original bowl & mix in the chips with it. This little bit of flour will help the chips not settle into the bottom of the pan.

Monday, May 30, 2011

Recipe Swap! Dessert - Fresh Peach Cake

I have to say I was a little worried about this swap. I love to bake so that was not the reason... Why? I was worried I'd get a "short-cut" recipe with a boxed cake mix as an ingredient. As silly as that sounds, I absolutely do not "do" box mixes for cakes, pancakes, anything. I even make my own Bisquick substitute. So I was delighted when I got Melissa's (I Was Born to Cook) Fresh Mango & Pecan Cake. I was quite happy. Except for one thing- my in-law's are not fans of mango & this dessert was meant to be brought to their Memorial Day BBQ. And what Gabriel's Grandparents want, I bake because they deserve it. Then  I realized that the recipe it was originally based on was a fresh Peach Cake! Bingo (as Grandma Lucille sings to Gabriel)! I adore Ina, so I stuck close to her recipe:
Barefoot Contessa Fresh Peach Cake
with the slight baking time adjustment of 35 minutes in my daisy pan... & adding a "dash of Confectioner's Sugar" at the end, right before serving :)

It was delicious! Like a coffee cake with some spunk. Can I tell you this made me long for a trip to Georgia? Between the fresh peaches & the pecans (my Sister-in-Law's grandparents have a farm in Georgia with excess of pecans (can you imagine that?!) And I remember the freezer full of the nuts they "pushed" politely on us :) Who was I to say no, thank you?! Ironic that a cake that started off with mangoes, reminiscent of my home state of Florida, would bring me great memories of another Southern State. And this is why I love food.

So again, I tried something new & love this recipe swap. Thanks, Melissa & ... Thank y'all for reading!

PS- Do you not LOVE my Daisy Pan?!? It is my most favorite baking pan since daisies are my favorite flower! The beginning of summer indeed! Happy Memorial Day everyone!

Sunday, May 29, 2011

Caprese Pasta Salad

 Happy Memorial Day weekend everyone! This weekend is the unofficial start of summer... the weekend to reflect upon our military & a time to gather with friends & family. I always bake dessert (Fresh Peach Cake this time) but I also like to make a non-fussy, easy side. Don't be worried though- it is delicious! And it is very outdoor, BBQ friendly, since it contains no mayo.

I love the freshness of the Caprese Salad. Add pasta & it just may be the perfect meal. Caprese's  traditional components are: tomatoes, basil & mozzarella, the colors of the Italian flag. This may seem funny- preparing an Italian dish for Memorial Day, but, why not? While my little family was at Liberty State Park yesterday, we gazed out at Ellis Island & the Statue of Liberty... Ellis Island where my hubby's Italian family & part of my family came through... And isn't that what the U. S. A. is about?

Have a great weekend all, with your loved ones. God Bless our men & the women in the Military!

Caprese Pasta Salad

  • 1 lb. Pasta, I use bowtie
  • 3-4 TBSp Extra Virgin Olive Oil
  • 1 tsp Garlic Powder
  • Pinch of Kosher Salt
  • 1 pint grape Tomatoes
  • 8 oz. Fresh Mozzarella
  • 2-3 TBSp fresh Basil

Cook the pasta to box directions. Drain, add in the olive oil, garlic powder, & salt. Set aside- allow the pasta to cool to room temperature.


Slice the grape tomatoes in half & add the halves to the pasta. Cut the mozzarella into bite-sized pieces & add it to the pasta.  Lastly, chiffonade the basil, &, add it into the pasta. Toss everything together so that it is very coated with the oil.


Serve at room temperature or cold. Enjoy!

I love fresh mozzarella in almost everything, including lasagna but especially in cold salads. And you can use minced garlic but I think the powdered form is better since this is a lighter, cooler pasta.

* Lishie Tip- Chiffonade the basil at the very last moment, that will maintain it's "green-ness" & freshness. Mine was picked moments before in my Father-in-Law's garden. The aroma was intoxicating!

I often add ingredients to this recipe as well... sliced, roasted red peppers, quartered artichoke hearts, Sauteed Mushrooms to name a few... YUM!

Friday, May 27, 2011

Pasta Primavera

Pasta Primavera


  • 2 medium Carrots, cut into 2" pieces
  • 1 cup Broccoli florets
  • 1 medium zucchini, cut into 2" pieces
  • 1 Yellow Bell Peppercut into 2" pieces
  • 1 Red Bell Peppercut into 2" pieces
  • 1 Orange Bell Peppercut into 2" pieces
  • 1 cup New Potatoes, cut in halves
  • Extra Virgin Olive Oil
  • 1 TBSp your favorite herb mix- (*I used Lemon-Rosemary)
  • 1 Lemon, zest & juice
  • 1 lb. your favorite Pasta- (*I used Angel hair spaghetti, broken into pieces)
  • Parmesan Cheese, Freshly grated 

*All of the vegetables must be fresh!
Preheat oven to 450 degrees. Mix all of the veg in a large bowl & add the herbs & lemon zest. Sprinkle some olive oil onto the mixture, enough to lightly coat the veg. Toss all of the contents together well. Place on a foil-lined baking sheet in one layer & roast for 10 minutes... Take out of the oven & mix the veg around, then place the pan back into the oven for another 15 minutes.


While the vegetables are roasting, cook the pasta according to package directions, reserving a cup of the pasta water. 


When both the pasta is cooked & the veg is roasted, combine everything in a large bowl.  Add the lemon juice & as much of the reserved pasta water to make the pasta a little teeny tiny bit saucy. Serve hot, warm, at room temperature, or cold topped with parmesan cheese.


Here's my letter of endearment to this recipe high-lighting all of the wonderful things about it:


Dear Pasta Primavera,
-You are so tasty & good for me & my family... healthy & nutritious.
-You allow me to use all of the extra vegetables I tend to buy before they, well, rot.
-You are so versatile, I can use summer squash or green bell pepper or brussels sprouts, cauliflower, parsnips, radishes, onions, garlic cloves... I can use any Herb combo, whatever I feel like... any type of pasta shape I want... no confines!
- And speaking of, I can eat you hot, warm, or cold... You are welcome at my BBQ. 
I <3 you, Pasta Primavera! 
- DeLish

Thursday, May 26, 2011

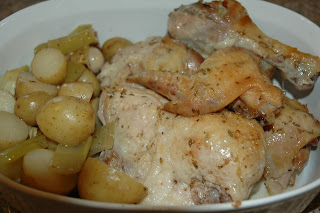
Chicken Vesuvio (chicken of volcanic portions)

My family loves this simple, rustic meal. It definitely has a lot of taste, the chicken is juicy, & it's easy to make on a weeknight with my adaptations & preparation methods.

I always need familiar dishes for when I am not feeling well. So I had a whole chicken in the fridge, waiting to be cooked & I was set to make a whole other dish... but not the energy... Enter: Chicken Vesuvio, a Giada De Laurentiis "go to" meal.

I prep it & partially cook the dinner the night before so I can come home, slip my Dutch oven into the oven, & have dinner on the table within an hour.  With this in mind, I began this dish on Wednesday night & finished it tonight- Thursday.
And boy was it delish! :)

Here's what I did:

Chicken Vesuvio

(adapted from Giada De Laurentiis)


  • 3 tablespoons olive oil
  • 1 whole Chicken, pieced (Giblets removed)
  • S & P
  • 1 lb new potatoes, halved
  • 2 Celery Stalks, chopped into 2" pieces
  • 4 large garlic cloves
  • 3/4 cup dry white wine
  • 1 & 3/4 cup water
  • 1 1/2 teaspoons dried oregano
  • 1 teaspoon dried thyme
  • 1 can artichoke hearts 

Heat the oil in large in a Dutch oven (or heavy pot) over high heat. S & P the chicken, then brown the chicken pieces on each side working in batches, about 10 minutes. Using tongs, transfer the chicken to a bowl. Brown the potatoes in the same pot & then add the celery, saute it for another minute. Add the whole garlic cloves, just smashed. Add the wine, stirring to scrape up any brown bits on the bottom of the pot. Add the water, oregano, & thyme. Return the chicken to the pot. Stir to combine. Bring to a boil over medium-high heat.


This is where I turn off the heat, allow the dutch oven to cool, then place it in the fridge, covered first, with plastic wrap. And second, with the lid, to chill overnight till I get home the next day.


Next day... In the door... Oven at 450. Take off the cover & place inside the oven to bake, about 30 minutes, until the chicken is completely cooked through & the entire contents of the pot are steaming hot & the liquid is bubbling. Add in the artichoke hearts & cook, uncovered, for another 10-15 minutes. 


Transfer the chicken to a platter & arrange the potatoes, celery & artichoke hearts around the chicken. 
Serve & enjoy!
*Lishie tips- Placing the dutch oven into bake uncovered allows the chicken to crisp more. 
Adding the extra water allows for this to also be a good slowcooker meal. 
And not adding the butter at the end takes away fat. 


PS- Giada calls it Vesuvio after the volcanic mountain in Italy... for the steam that arises from the pot.

Wednesday, May 25, 2011

It's WINGS-Day again... you guessed it... Wingettes, but how?


Hot saucy goodness (according to Hubby)

Another Wednesday, another "Wingsday"... And I am trying again. This time I used a pastry brush to baste the wingettes with some hot sauce, then I broiled them to dark, crispy, near carmelized perfection. Had my hubby turn off the fire alarm for the cooking time period because I knew as soon as I'd had the broil on, that piercing sound would cause me to lose some of my hearing (don't get me wrong, I am extremely happy it works but not when I am cooking, ha! So then I braced myself for the heat that would fill my kitchen on a beautiful, windows-open, Spring (summer-like) day. It wasn't so bad though! And the chicken itself, smelled delicious.

Naked Wingettes
I also made the sauce again with a butter substitute. The verdict? Hubby was very happy tonight!!! YAY home run... Hopefully soon we'll get a new grill & outside wingsday shall be!


Broiled Hot Wingettes
  • Cooking Spray

  • 3 lbs. Wingettes

  • 2 TBSp Butter Substitute, melted (hubby chose "I Can't Believe It's Not Butter")

  • 1 TBSp Honey

  • 1 cup Hot Sauce (we use Frank's Original) + extra for coating the chicken before broiling
Line a broil-safe sheet pan with foil & spray it with cooking spray. Place the wingettes on the sheet & "paint" them using a pastry brush with some hot sauce. Broil on the one side for 10 minutes. Turn the chicken pieces over, brush the new, uncooked side with a coat of hot sauce & broil for another 10 minutes or until the pieces are browned & crispy.

In a large bowl, combine the melted butter substitute, the honey & the hot sauce. mix all of the wingettes in with the sauce, covering each completely.


Serve with blue cheese & celery sticks. Oh, & crusty bread :)

*Lishie tip- If they're too spicy, don't drink water! It makes the burn worse. Crusty bread is a great side to decrease the heat!

Also if you, unlike me, love hot sauce, place a TBSp of it in your potato salad, along with a TBSp of relish to make your salad Louisiana style :)

Tuesday, May 24, 2011

French Toast


 French Toast reminds me of college... Early morning (I mean the wee hours of the morning) breakfasts in the East Village at Veselka (yum, go for brunch!) or Odessa. We'd order French toast Challah. (Challah is an egg bread). It was so delicious & perfect.

The other morning I only had plain white bread so I spruced it up by making French Toast. Another easy breakfast that tastes & sounds more special & harder than the effort it truly takes to make it!

French Toast
  • 1 egg
  • 2-3 TBSp Milk
  • Dollup of Vanilla
  • Pinch of Cinnamon
  • pat of Butter (1 TBSp)
  • 2 pieces of bread, challah or brioche preferred, white or wheat perfectly fine
  • Maple Syrup, to top
In a shallow bowl, scramble the egg & whisk it together with the milk, vanilla & cinnamon. 


Turn the griddle or non-stick pan on Medium-High heat & melt the butter. When the butter is melted... Quickly dip one piece of bread into the egg mixture, both sides, then place onto the griddle. When the edges begin to brown, flip the piece over. Do the same with the second piece of bread. 


Serve warm with a sprinkle of cinnamon or confectioner's sugar, & a dash of maple syrup.


Serves 1.  Just multiply the ingredient  amounts times the the number of people you are serving.

Sunday, May 22, 2011

Homemade Sloppy Joes


It's a bit chilly out today but not cold enough to warrant a stew or something extremely hearty. I was glancing through my America's Text Kitchen cookbooks since the BEA- Book Expo America is coming up this week in NYC & ATK will be there. I love stopping by their table. And I love even more that they  have given out free food & cookbooks, signed right there. Sloppy Joes sort of stuck in my mind & I decided to make them tonight. They are a comforting food & home made, not full of all of the sodium, salt & sugar the canned stuff comes chock full of... These are so tasty. I have some leftover which I may even mix with a little pasta for a lunch for me. Make these- your kids will love them & you'll be happy because it is good for them. We had potato salad & fresh dill pickles on the side.

Sloppy Joes
Adapted from America's Test Kitchen
Serves 4

  • 2-3 TBSp veg oil
  • 1 med onion, finely diced
  • 2 Garlic cloves, minced 
  • 1/2 tsp chili powder
  • 1 lb 85 % ground beef, I use Angus
  • S & P1 tsp brown sugar
  • 1 cup tomato puree
  • 1/2 cup ketchup
  • 1/4 cup water
  • 4 Kaiser Rolls

Heat oil over medium-high heat, about 1 minute. Add onion, stir until covered in the oil. Cover & allow to soften but not brown (about 10 minutes). If it begins to brown, lower the heat.  Add the garlic & chili powder and saute for 30 seconds. Add beef, S & P, brown sugar & reduce heat to medium. Cook, breaking up meat into small pieces, using a wooden spoon, until meat is almost no longer pink, about 3 min.


Add the puree, ketchup, & water. Cook until slightly thickened, about 4-8 minutes.


Serve on Kaiser buns. 


*Lishie tip- use a good, sturdy bread or bun (like a kaiser- I had plain, my hubby chose with poppy seed. Have  told you all that he goes grocery shopping with me EVERY week! Yep!) a regular hamburger bun will absorb any of the sauce like a sponge, become soggy & fall apart. Yuck.)

Saturday, May 21, 2011

Blueberry Waffles

So here's my non-judgmental breakfast for the day predicted to be Rapture, Judgment Day. By far not my last meal but waffles are pretty perfect.  Add fresh blueberries (yes, I do love themes) & boy, they are better than perfect. These are regular waffles, not Belgian, not buttermilk but darn tasty. They are the food people tend to order at a diner because they just seem special. And they are. It was shown to me this morning when I surprised my inlaws with them at 8:30, piping hot off the waffle iron- you should have seen the happy look on their faces (you'll just have to trust me on that one- it's true- I don't lie)! You do need a Waffle maker & I love mine... It's one of those things that I do use. If you love waffles, get one!

Blueberry Waffles

  • 1 & 3/4 cup AP Flour
  • 2 TBSp Sugar
  • 1 TBSp Baking Powder
  • 1/4 tsp Salt
  • 2 Eggs
  • 1 & 3/4 cup Milk (I use Skim)
  • 1/2 cup Canola Oil
  • 1 tsp Vanilla
  • 1/4 cup fresh Blueberries

In a medium bowl stir together flour, sugar, baking powder, & salt. Make a well in center of flour mixture- in other words, push all of the flour mix to the sides of the bowl creating a “hole” in the middle. Set aside.

In another medium bowl beat eggs slightly; stir in milk, oil, & vanilla. Add egg mixture all at once to flour mixture. Stir just until moistened (batter should be slightly lumpy) then fold in the blueberries.

Pour 1 to 2 ice cream scoops of batter onto of a preheated, lightly cooking aprayed waffle baker. Close lid quickly; do not open until done!!!

Follow your waffle maker instructions- mine beeps when the waffle is finished cooking. Carefully lift the waffle (from its edge) from the hot iron with a heat resistant, silicone spatula.

Serve with maple syrup or sprinkle some powdered sugar on top! YUM.

Lishie-ism- My first waffle ALWAYS comes out deformed, or too light or something. But you know what? It’s always my favorite!!!


It's been raining here in NJ for days so this morning's sun had to be photographed. Ah Heaven: NOT Rapture :)
If you want my Buttermilk Waffle Recipe, go HERE.

Friday, May 20, 2011

Blueberry Muffins


Continuing on the Blueberry theme (I like themes) I also made muffins. This muffin recipe is very versatile, you can add a streusel to the top before baking OR you can switch out the blueberries for so many other  ingredients... cranberries, banana, nuts, chocolate chips... most anything. These are regular sized muffins & they are pretty good for you too so no guilt to have one for breakfast, or two! And did I say they are delish?! They are!

& ha ha, I only had Elmo, Strawberry Shortcake or Duckie baking cups. Can you tell what I chose ;)?

Blueberry Muffins 
 Makes 12 muffins
  • 1 & 3/4  cups  AP flour
  • 1/3  cup  sugar
  • 2  tsp  baking powder
  • 1/4  tsp  salt
  • 1 egg, beaten
  • 3/4  cup  milk
  • 1/4  cup  canola oil
  • 3/4 cup fresh (or frozen) Blueberries
  • 1 tsp Lemon Zest
Preheat oven to 400 degrees F. 
Grease twelve 2-1/2-inch muffin cups or line with baking cups; set aside. In a medium bowl combine flour, sugar, baking powder, & salt. Make a well in center of flour mixture; set aside.
In another bowl combine egg, milk, & oil. Add egg mixture all at once to flour mixture. Stir just until moistened (batter should be lumpy). Fold in the blueberries & lemon zest. 
Spoon batter into prepared muffin cups, filling each 2/3 full. Top each with a little sugar for some crispy-ness (if not using streusal) Bake for 18 to 20 minutes or until golden & a wooden toothpick inserted in centers comes out clean. Cool in muffin cups on a wire rack for 5 minutes. Remove from muffin cups; serve warm.

*Lishie Tip- For extra moistness, add 1/2 cup plain vanilla yogurt to the egg, milk & oil mixture.

Thursday, May 19, 2011

Blueberry Buckle

I felt like baking tonight. Don't know why but I did... And I had fresh, beautiful blueberries... what to make, what to make... then I thought of Blueberry Buckle. A Buckle is an old-fashion term for a type of cake made in a single layer with berries added to the batter. Usually made with blueberries (but you can switch out raspberries, blackberries or boysenberries...), the topping is similar to a streusel, which gives it a "buckled" or crumpled appearance. This is so delicious, perfect for fresh berry season. I brought some to my in-laws immediately to share. I'd share with you too!

Blueberry Buckle
  • 2  cups  AP flour
  • 2 & 1/2  tsp  baking powder
  • 1/4  tsp salt
  • 1/2  cup  shortening
  • 3/4  cup  sugar
  • 1    egg
  • 1/2  cup  milk
  • 1 & 1/2  cups  fresh (or frozen) blueberries
Topping:
  • 1/2  cup  AP flour
  • 1/2  cup  sugar
  • 1/2  tsp cinnamon
  • 1/4  cup  butter 
Grease an 8x8x2-inch baking pan; set aside. In a medium bowl combine the 2 cups flour, baking powder, & salt; set aside.
In a medium mixing bowl beat shortening on medium speed for 30 seconds. Add the 3/4 cup sugar. Beat on medium to high speed until light & fluffy. Add egg; beat well. Add flour mixture & milk alternately to egg mixture, beating until smooth after each addition.
Spoon batter into prepared pan. Sprinkle with blueberries. In another bowl combine the 1/2 cup flour, the 1/2 cup sugar, & cinnamon. Using a pastry blender, cut in butter until mixture resembles coarse crumbs; sprinkle over blueberries. Bake in a 350 degree F oven for 50 to 60 minutes or until golden. Serve warm. 
*Lishie tip- Again, if you do not have a pastry blender, just use a fork! Unless you bake tons like I do, you don't really need one but it's a great gadget to have. And it's pretty inexpensive.

Hummus & Pita Chips

I love, love, love hummus. It's my "in front of the tv treat" with pita chips. YUM. Sometimes, I also love to have it as a vegetarian sandwich in a pita with lettuce & tomato & cucumber. It's full of protein & so good. The following recipe is very versatile. Add tahini sauce for extra flavor or roasted red peppers... And the chips? Think of your favorite flavors & season away!!!


Hummus

  • 2 cups canned chick peas, drained
  • Juice & Zest of 2 Lemons
  • 3 cloves garlic
  • Kosher Salt
  • Pinch of Sweet Paprika


Place everything into the Food Processor & combine until the texture you like. 


*Sometimes I add chopped roasted, red pepper too!


Pita Chips


  • Bag of Pita Bread (I get plain, white)
  • Olive Oil, to coat
  • *Seasoning (You could use anything!) I use Sea Salt


Pre-heat oven to 400 degrees. Cut each pita in half & then into 8 wedges. Arrange the pita wedges on a large baking sheet. Pour olive oil over the pita triangle piecess. Toss and spread out the wedges, not overlapping. Sprinkle Sea Salt (or whatever seasoning). Bake for 8 to 12 minutes, or until toasted and golden in color.


No tip here unless you HAVE one FOR me! LOL... just an observation... why do my pitas ALWAYS look like my toddler cut them? They break so easily! Good thing, they taste yummy no matter what.

Wednesday, May 18, 2011

Wingsday... Again. Grilled Buffalo Wingettes

Red Hot Wings!
So it is Wednesday again, i.e.- Wingsday... & I am trying once more to make a healthier.just.as.satisfying.version of my hubby's beloved deep fried Buffalo Wings. This is attempt #4 to make them an alternate way. I've baked, & I've broiled them & I made them as tenders dipped in flour on the skillet- Buffalo Chicken Fries.

This week it was Grilling time. And, again, I used a butter substitute. 

Hubby's verdict? And again, the sauce was still good despite the butter sub. He actually said he din't taste a difference! And he liked these the best.

Grilled Buffalo Wingettes 
Cooked Wings, without sauce
  • Cooking Spray
  • 3 lbs. Wingettes or wings
  • S & P *Optional (did not use)
Sauce:
  • 3 TBSp Butter Substitute, melted (Michael chose "I Can't Believe it's Not Butter")
  • 1 TBSp Honey
  • 1 cup Hot Sauce (I use Frank's Red Hot) 
In a large bowl, whisk together the sauce  ingredients & set aside. 

Spray the grill pan with cooking spray. Lay out the wingettes in one layer. Spray the chicken with cooking spray. Grill on each side for 10-12 minutes minutes or until the chicken is cooked.

When the wingettes are cooked, while still hot, toss them in the sauce then serve.

*Lishie tip- Serve with nice crusty bread to tone down the heat. Water just makes makes the sting burn worse!

Grilled Portobello Mushroom Burgers

Grilled Portobello Mushroom Burgers

  • 4 TBSp Extra Virgin Olive Oil
  • 2 TBSp Balsamic Vinegar
  • 1 TBSp chopped Basil
  • 1 tsp Oregano
  • S & P
  • 2  Portobello caps
  • Cooking Spray

Whisk together the olive oil, vinegar, basil, oregano & S &P. Place the cleaned portobello caps in a large ziploc bag with the oil/vinegar mixture. Allow it to marinate for 10-15 minutes at room temperature.


When ready, heat the grill pan on Medium-high & spray it with cooking spray.  Grill each portobello side about 10 minutes. (If using cheese, when you flip the portobello cap, place cheese on the already-grilled side.)

I served them on rolls with sliced roasted red pepper, lettuce & tomato. If you want cheese, provolone or mozzarella would be delicious on these!

*Lishie tip- to clean mushrooms, take a damp towel & simply pat off any dirt. Do not immerse fungi ;) in water because they absorb like sponges. This is also the reason why you should not marinate for a long period of time! Only 15 minutes or less or the caps will be inundated with liquid.