Showing posts with label Main Dish. Show all posts

Friday, May 31, 2013

Slow Cooker Honey BBQ Boneless Pork Loin Ribs

I was super excited for these. The house smelled gorgeously of bbq & honey... Mmmmm... 8 simmering hours. I made these on a day when we were home, in advance because I'm a bit freaked out by leaving something plugged in on all day. Anyone else? So at the end of the cook-time, I tasted the melt-in-your-mouth pork... it was absolutely delicious. Then I did something really stupid. I dished the steaming hot contents into a bowl, topped it with tinfoil for the cool down process. And.left.it.OUT.on.the.counter. OVERNIGHT. (Anyone else?) Bye bye pork ribs :(

I shall be making these again, very very soon! This is the perfect dish if you want BBQ or it you want something delicious without turning on the oven. 

<3 Lishie


Slow Cooker Honey BBQ Boneless Pork loin Ribs
End Product
  • 3 to 4 lbs boneless pork loin ribs
  •  S&P
  • 1/4 c light brown sugar, packed
  • 2 cloves garlic, minced
  • 1/2 c honey
  • 1 bottle barbecue sauce
Spray the insert of a 5 to 6-quart slow cooker. Place pork, fattier side down into the pot. Sprinkle pork with s & p, brown sugar, & minced garlic; turn the pork ribs to coat all pieces. Pour honey & BBQ Sauce evenly over the pork. Cover & cook on LOW for 8 hours. Serve w/ more BBQ sauce on the side.

Thursday, October 4, 2012

Crockpot Lasagna


OK, this recipe is good if you really have no time to put together a traditional lasagna & want to eat it that night. Also, if you have no luck with lasagna noodles, this is your recipe! It was ok for me. It was filling, my hubby liked it enough but 2 bothersome things- the "crunch" on top of course is missing & al dente? Ha! The noodles are VERY well cooked. Still, if you want lasagna fast, without much prep, make this:
<3 Lishie

Crockpot Lasagna
  • 1 lb.  ground beef
  • 1 small onion, diced
  • 2 cloves garlic, minced
  • 1 large can (24 oz.) tomato sauce
  • 1 tsp. dried oregano
  • 1 container  (15 oz.) ricotta cheese
  • 2c shredded mozzarella cheese, divided
  • 1/4c  grated parmesan cheese, divided
  • 1 egg
  • 2 TBSp  chopped, fresh parsley
  • 6 lasagna noodles, uncooked

Brown meat in large skillet until most of the pink is gone, then drain & return to stove. Add in onion & garlic. Stir in sauce & oregano. Simmer for 20 minutes.  Mix ricotta, 1-1/2 c mozzarella, 2 TBSp Parmesan, egg & parsley.
Layer into Crock-pot:  Meat sauce/noodles (broken to fit)/spread cheese mixture. Meat sauce/noodles (broken to fit)/spread cheese mixture. Meat sauce/noodles (broken to fit)/spread cheese mixture. Cover & cook on slow for 4 hours or until liquid is absorbed. Sprinkle with remaining cheeses & allow to melt before serving. 

Friday, March 23, 2012

Recipe Swap~ Filipino Grilled Chicken

This week's exciting swap was SRC-style, which meant we could choose any recipe from the blog we were given!!! The wonderful part of this swap? I had a recipe already book-marked that was on my assigned blog, Cathy's Kitchen Journey!

I had spied her Filipino Grilled Chicken & really wanted to make it. I am forever looking for new chicken recipes/marinades. I used boneless, chicken breasts, & also used my grill pan, inside. The only slight change I made was using low-sodium soy sauce, the only type I buy. Such interesting flavors!!! I think it was a tad bit too sweet for our taste & I am wondering if I used seltzer & fresh lemon & lime next time if the same outcome would occur? But all in all, we enjoyed this change up from Cathy. THANK you! And as always, thank you, Sarah from A Taste of Home Cooking for hosting! I can't wait to see what the blogger who received my blog made!

<3 Lishie

Filipino Grilled Chicken (Inihaw na manok)

slightly adapted from  cathy's kitchen journey
  • 1 c apple cider vinegar
  • 1/2 c granulated sugar
  • 1/4 c low-sodium soy sauce
  • 12 oz lemon-lime soda (I used Sprite)
  • 3 bay leaves, torn or crushed
  • 3 garlic cloves, minced
  • 1 TBSP ground black pepper
  • 2 lbs chicken (I used boneless chicken breasts)
In a bowl, combine all the ingredients except chicken. Whisk until the sugar has dissolved. Reserve half for basting in a separate container with a lid.
Place the chicken in a plastic zip top bag. Pour the the marinade into the bag. Seal tightly and mix the liquid around to coat the chicken. Place in fridge to marinate for at least 3 hours or overnight.
When ready to grill, take the chicken out of the fridge and let come to room temperature. Remove the chicken from the marinade and place on a plate. Discard marinade.
In a sauce pan, bring the reserved marinade to a boil over medium-high heat until it has reduced to a sticky syrup.
Bring the grill to 350° F or heat on medium heat. Grill the chicken for 10 minutes each side, basting each side with the sticky syrup. [Depending on the size of your chicken, cook time may be longer. My chicken pieces were flat, so they cooked fairly quick on the grill.]
Cook until juices run clear. Take the chicken off the grill and let rest for 5 minutes before serving.

Wednesday, June 1, 2011

Gingery Chicken ~ Slowcooker

So it's back to work after a long, beautiful Memorial Day weekend. I had the prep time so I went ahead & readied this dish for the day back to work. I recently got America's Test Kitchen "Slowcooker Revolution" Cookbook & I was so excited. I love ATK & their recipes are delicious & trustworthy. Plus they explain why some things work & some things do not. This recipe is adapted from one in their book. Since I only have a 6 Quart Crock-Pot, I made 3 split chicken breasts which is enough for our family.


The chicken came out mighty juicy & the sauce is yummy... I made white rice on the side & poured the gingery sauce over it. As another side, I made roasted cauliflower, adding one tsp of fresh, minced ginger to the dressing. Silly me was too tired/too sick- forgot to take pictures of the dish all gussied up! ;) Sorry! 

Slowcooker Gingery Chicken, adapted from America's Test Kitchen

  • 2 TBSp Canola Oil
  • 3 Split, bone-in Chicken Breasts
  • 1 Onion, chopped small
  • 3 large Garlic Cloves, minced
  • 3 TBSp fresh Ginger, minced
  • 1/4 cup AP Flour
  • 1 cup Chicken Broth
  • 3 TBSp Soy Sauce (I always use low-sodium)
  • 1 TBSp Sugar
  • S & P
  • 2 Scallion stalks, Optional topping

On medium-high, heat the canola oil & brown the chicken breasts on both sides. Do it in batches if you need the room. <<*My crock-pot is stove-top friendly. If yours is not, use a large saute pan.>> Remove the browned chicken pieces. In the same oil, saute the onion till it is clear, about 8-10 minutes. Add the garlic & 2 TBSp of the ginger... saute for another minute. 


Mix in the flour & cook while stirring for a minute. While whisking, add in the chicken broth & get all of the good, brown bits up! <<*If you are using a saute pan, TRANSFER to the crock-pot now.>> Add in the soy sauce, sugar & S & P & whisk till combined. Nestle in the chicken pieces... 


Cook on LOW for 4-6 hours. Remove the chicken & place on serving platter. Skim the fatty oil off of the top of the sauce then add in the last TBSp of ginger. Ladle sauce over chicken pieces. Serve the chicken topped with scallions.

Sunday, May 29, 2011

Caprese Pasta Salad

 Happy Memorial Day weekend everyone! This weekend is the unofficial start of summer... the weekend to reflect upon our military & a time to gather with friends & family. I always bake dessert (Fresh Peach Cake this time) but I also like to make a non-fussy, easy side. Don't be worried though- it is delicious! And it is very outdoor, BBQ friendly, since it contains no mayo.

I love the freshness of the Caprese Salad. Add pasta & it just may be the perfect meal. Caprese's  traditional components are: tomatoes, basil & mozzarella, the colors of the Italian flag. This may seem funny- preparing an Italian dish for Memorial Day, but, why not? While my little family was at Liberty State Park yesterday, we gazed out at Ellis Island & the Statue of Liberty... Ellis Island where my hubby's Italian family & part of my family came through... And isn't that what the U. S. A. is about?

Have a great weekend all, with your loved ones. God Bless our men & the women in the Military!

Caprese Pasta Salad

  • 1 lb. Pasta, I use bowtie
  • 3-4 TBSp Extra Virgin Olive Oil
  • 1 tsp Garlic Powder
  • Pinch of Kosher Salt
  • 1 pint grape Tomatoes
  • 8 oz. Fresh Mozzarella
  • 2-3 TBSp fresh Basil

Cook the pasta to box directions. Drain, add in the olive oil, garlic powder, & salt. Set aside- allow the pasta to cool to room temperature.


Slice the grape tomatoes in half & add the halves to the pasta. Cut the mozzarella into bite-sized pieces & add it to the pasta.  Lastly, chiffonade the basil, &, add it into the pasta. Toss everything together so that it is very coated with the oil.


Serve at room temperature or cold. Enjoy!

I love fresh mozzarella in almost everything, including lasagna but especially in cold salads. And you can use minced garlic but I think the powdered form is better since this is a lighter, cooler pasta.

* Lishie Tip- Chiffonade the basil at the very last moment, that will maintain it's "green-ness" & freshness. Mine was picked moments before in my Father-in-Law's garden. The aroma was intoxicating!

I often add ingredients to this recipe as well... sliced, roasted red peppers, quartered artichoke hearts, Sauteed Mushrooms to name a few... YUM!

Friday, May 27, 2011

Pasta Primavera

Pasta Primavera


  • 2 medium Carrots, cut into 2" pieces
  • 1 cup Broccoli florets
  • 1 medium zucchini, cut into 2" pieces
  • 1 Yellow Bell Peppercut into 2" pieces
  • 1 Red Bell Peppercut into 2" pieces
  • 1 Orange Bell Peppercut into 2" pieces
  • 1 cup New Potatoes, cut in halves
  • Extra Virgin Olive Oil
  • 1 TBSp your favorite herb mix- (*I used Lemon-Rosemary)
  • 1 Lemon, zest & juice
  • 1 lb. your favorite Pasta- (*I used Angel hair spaghetti, broken into pieces)
  • Parmesan Cheese, Freshly grated 

*All of the vegetables must be fresh!
Preheat oven to 450 degrees. Mix all of the veg in a large bowl & add the herbs & lemon zest. Sprinkle some olive oil onto the mixture, enough to lightly coat the veg. Toss all of the contents together well. Place on a foil-lined baking sheet in one layer & roast for 10 minutes... Take out of the oven & mix the veg around, then place the pan back into the oven for another 15 minutes.


While the vegetables are roasting, cook the pasta according to package directions, reserving a cup of the pasta water. 


When both the pasta is cooked & the veg is roasted, combine everything in a large bowl.  Add the lemon juice & as much of the reserved pasta water to make the pasta a little teeny tiny bit saucy. Serve hot, warm, at room temperature, or cold topped with parmesan cheese.


Here's my letter of endearment to this recipe high-lighting all of the wonderful things about it:


Dear Pasta Primavera,
-You are so tasty & good for me & my family... healthy & nutritious.
-You allow me to use all of the extra vegetables I tend to buy before they, well, rot.
-You are so versatile, I can use summer squash or green bell pepper or brussels sprouts, cauliflower, parsnips, radishes, onions, garlic cloves... I can use any Herb combo, whatever I feel like... any type of pasta shape I want... no confines!
- And speaking of, I can eat you hot, warm, or cold... You are welcome at my BBQ. 
I <3 you, Pasta Primavera! 
- DeLish

Thursday, May 26, 2011

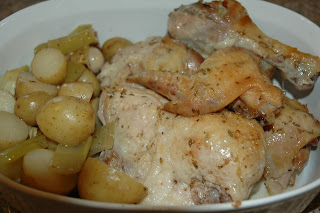
Chicken Vesuvio (chicken of volcanic portions)

My family loves this simple, rustic meal. It definitely has a lot of taste, the chicken is juicy, & it's easy to make on a weeknight with my adaptations & preparation methods.

I always need familiar dishes for when I am not feeling well. So I had a whole chicken in the fridge, waiting to be cooked & I was set to make a whole other dish... but not the energy... Enter: Chicken Vesuvio, a Giada De Laurentiis "go to" meal.

I prep it & partially cook the dinner the night before so I can come home, slip my Dutch oven into the oven, & have dinner on the table within an hour.  With this in mind, I began this dish on Wednesday night & finished it tonight- Thursday.
And boy was it delish! :)

Here's what I did:

Chicken Vesuvio

(adapted from Giada De Laurentiis)


  • 3 tablespoons olive oil
  • 1 whole Chicken, pieced (Giblets removed)
  • S & P
  • 1 lb new potatoes, halved
  • 2 Celery Stalks, chopped into 2" pieces
  • 4 large garlic cloves
  • 3/4 cup dry white wine
  • 1 & 3/4 cup water
  • 1 1/2 teaspoons dried oregano
  • 1 teaspoon dried thyme
  • 1 can artichoke hearts 

Heat the oil in large in a Dutch oven (or heavy pot) over high heat. S & P the chicken, then brown the chicken pieces on each side working in batches, about 10 minutes. Using tongs, transfer the chicken to a bowl. Brown the potatoes in the same pot & then add the celery, saute it for another minute. Add the whole garlic cloves, just smashed. Add the wine, stirring to scrape up any brown bits on the bottom of the pot. Add the water, oregano, & thyme. Return the chicken to the pot. Stir to combine. Bring to a boil over medium-high heat.


This is where I turn off the heat, allow the dutch oven to cool, then place it in the fridge, covered first, with plastic wrap. And second, with the lid, to chill overnight till I get home the next day.


Next day... In the door... Oven at 450. Take off the cover & place inside the oven to bake, about 30 minutes, until the chicken is completely cooked through & the entire contents of the pot are steaming hot & the liquid is bubbling. Add in the artichoke hearts & cook, uncovered, for another 10-15 minutes. 


Transfer the chicken to a platter & arrange the potatoes, celery & artichoke hearts around the chicken. 
Serve & enjoy!
*Lishie tips- Placing the dutch oven into bake uncovered allows the chicken to crisp more. 
Adding the extra water allows for this to also be a good slowcooker meal. 
And not adding the butter at the end takes away fat. 


PS- Giada calls it Vesuvio after the volcanic mountain in Italy... for the steam that arises from the pot.

Saturday, May 14, 2011

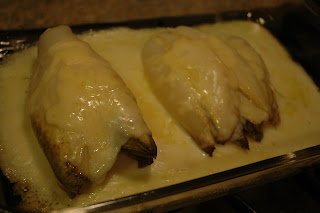
Stuffed Belgian Endive + Mac & Cheese & Broccoli

~ Blogger lost 2 posts- I combined them & am posting again. Apologies ~


I love Endive & I love Food Network's Melissa d'Arabian. Part of it is because I make a lot of similar dishes. The other part is she's very lovable. She's passionate about her children & what they eat. When I saw this recipe on her show I was so excited because I absolutely love endive. It's so healthy too- rich in folate, vitamins A & K & it's rich in fiber. The thing is, I think my preference for it is in it's raw, crispy & cold form, in a salad or as an appetizer. Don't get me wrong though, this was delicious & it did make me happy. Oh & it gave me an idea for a great appetizer (soon to be blogged!)


Adapted from:  Stuffed Belgian Endive Melissa d'Arabian 
  • 1 TBSp butter
  • 1 TBSp flour
  • 3/4 cup milk, heated
  • 1 tsp Dijon mustard
  • 1 tsp granulated garlic
  • 1/4 cup shredded Gruyere, divided
  • 2  medium Belgian endives
  • 4 small slices Gruyere
  • S & P
  • Cooked turkey burger
  • cooking spray
I made are the substitutions I did because: 1) I like Gruyere & dislike Swiss cheese & 2) I had leftover, cooked turkey burger which is better for me than deli meat. You could also switch out the ham for deli turkey or make this veggie without meat. And I halved the recipe since only I would be eating it- hubby does not like endive. He has his Buffalo wingettes.

I noticed when I was serving myself that I had a lot of extra sauce. So I threw some water on to boil to make noodles. I figured the delicious cheese sauce would make a great mac & cheese for lunch & I added the leftover broccoli on hand. 

*Lishie tip- if you have anything delicious leftover, utilize for a small lunch! Be creative- then it won't seem like you are eating the same thing or a "leftover". No ho hum- just nom nom! :) 

Mac & Cheese & Broccoli
    Mac & Cheese & Broccoli


  • 1 cup cooked Noodles (or any small pasta), cooked to package directions.
  • Leftover Sauce from above OR below
  • Leftover Roasted Broccoli
Toss it all together hot & serve! Simple. So easy.

You could also make the sauce from the above all by itself:
Gruyere Sauce:
  • 1 TBSp butter
  • 1 TBSp flour
  • 3/4 cup milk, heated
  • 1 tsp Dijon mustard
  • 1 tsp granulated garlic
  • 1/4 cup shredded Gruyere
Melt the butter over medium heat & whisk in the flour, cooking it for about 2 minutes. Slowly add in the milk, constantly whisking. Cook & whisk for a few more minutes until the sauce thickens. Take the saucepan off of the heat & add in the mustard, garlic & cheese.

It's WINGS-Day again... Broiled Buffalo Wingettes


Wednesday, as most of our friends know, is Wingsday at the D household for my hubby. Unfortunately, since he's had to restrict certain foods due to his high cholesterol, ordering them in or making them the "all-tasty" deep fried method is not on the menu. So I have been attempting to make it alternate ways. I've baked them & I made them as tenders dipped in flour on the skillet- Buffalo Chicken Fries. This week I broiled them. And I used a butter substitute. 

Hubby's verdict? The sauce didn't seem any different (yay!) but the wings themselves were ok, just good. I think that no matter what way I cook them, unless it is fried, he won't be over the moon for them but he will be satisfied. And he has to be, because healthy is the way to go! So give them a try!!!


Broiled Buffalo Wingettes 

Broiled wingettes before their sauce bath

  • Cooking Spray
  • 3 lbs. Wingettes or wings
  • S & P *Optional (did not use)

Sauce:

  • 3 TBSp Butter Substitute, melted (Michael chose "I Can't Believe it's Not Butter")
  • 1 TBSp Honey
  • 1 cup Hot Sauce (I use Frank's Red Hot) 


In a large bowl, whisk together the sauce  ingredients & set aside.


Line a broiler-friendly pan with aluminum foil & spray it with cooking spray. Lay out the wingettes in one layer. Spray the chicken with cooking spray. Broil for 10 minutes, then turn every piece onto it's other side. Spray non-cooked side with cooking spray. Broil another 10 minutes or until golden brown.


When the wingettes are cooked, while still hot, toss them in the sauce then serve.

*Lishie tip- Serve with nice crusty bread to tone down the heat. Water just makes makes the sting burn worse!

Have a said again- I DO NOT LIKE THE SMELL OF HOT SAUCE? LOL!?!

Wednesday, May 11, 2011

Juicy Turkey Burgers

   
These burgers are extremely juicy, I guarantee it! Everyone's always asking for "juicy" turkey burgers & I think the #1 complaint is dryness.  And I use the leanest cut of ground turkey too. 

This is a burger base you can pretty much add any toppings to. I like my burgers straight up & for the flavor to come from the meat & the "added" flavor to come from toppings. (The only exception is with my cheese-stuffed burgers.) YUM    

Even my hubby who usually won't touch turkey burgers said they were good. I'm glad since they are so much healthier than red meat.
Turkey Burgers
  • 1 lb. ground turkey (I use the leanest)
  • 2 cloves garlic, minced
  • 2 TBSp Olive Oil (couple of shakes of the bottle)
  • 1/2 cup Panko Bread Crumbs
  • 2 tablespoons Dijon mustard
  • 1 egg
  • 1/2 tsp salt
  • 1/8 tsp pepper
Toppings- Optional
We topped with shredded cheddar, Dijon & Tomato. & love Potato Rolls!
Use whatcha like! 

 Place ground turkey in a bowl & add all of the other ingredients. Mix quickly with your hands until everything is just combined. *Do not handle too much! Quarter the mixture into four even amounts. Pat each mound into a burger patty shape.

Turn your grill pan on high & spritz with cooking spray. Grill on each side about 6-7 minutes.

Serve on a bun with toppings of your choice!

*Lishie Tip- *As with all ground meat, do NOT overmix/over-handle! 

Tuesday, May 10, 2011

Recipe Swap! Marinated Flank Steak

So this week's theme for the Recipe swap is Grilling. I love these swaps, they are so much fun. I gave a recipe I haven't blogged yet: Grilled Flank Steak with Mushrooms- THE 1st meal I ever made for my hubby when we started dating... & got this sort of similar one from my friend Gianna Marinated Flank Steak. We haven't been eating too much red meat lately at all for health's sake so this was a nice break.


Marinated Flank Steak 
I (Gianna) got this recipe from a friend and it's delicious!
(This is for 1 large steak, you may need to double or triple, depending on how many steaks you make.)
  • 1/4 cup oil (I use olive)
  • 3 Tbs. red wine vinegar
  • 1/2 cup soy sauce
  • 1 Tbs. garlic powder
  • 1 Tbs. minced onion (I sometimes use onion powder)
  • 4 Tbs. Apricot Preserves (if you can't find that, you can use peach)
Whisk all ingredients in a bowl.  Put steak and marinade into a large zip lock bag.  Marinate for AT LEAST 3 hours...but it's best to do it over night....the longer it marinates the better for this recipe.    Make sure you toss the steak around the bag a bunch of times during the marinade process.
 
Get your grill as hot as you can and spray it with cooking spray.
 
Cook steak 3-4 minutes, then flip and do another 3-4 minutes.
Slice and serve!

Now because the recipe is from Gianna, this post, as her recipe, must be in comic sans font. No, really, it magically changed. It won't let me type in anything else now. ;-P 

I threw together the marinade last night... Using olive oil, red wine vinegar, LOW sodium soy sauce, 1-2 TBSp minced fresh garlic & onion & the apricot preserves (which I always have on hand for recipes- sweet & savory. It's a good pantry staple!) And mixed it all up into the Ziploc bag with the 1+ lb Flank steak & into the fridge.

I did not grill outside. Actually rarely do since I work then come home to cook & we live on the 2nd floor. Grilling outdoors is more of a weekend thing. Plus for the longest time, I had been a city apartment inhabitant. And A city resident's best friend? The grill pan! I absolutely love & cannot live with out mine- it's over 10 years old! It's the same pan I made the 1st meal for my hubby on. It's a square All-Clad. A-mazing! 

When I came home from work, I took the ziploc bag out & placed it on the counter top to come to room temperature. Then, along with hubby, took Gabriel outside for bubbles & sidewalk chalk time!  

Came inside, turned the burner on high, sprayed the pan with cooking spray, then seared the flank steak on both sides. I had the oven on making the side of roasted broccoli. I finished the steak off in the oven (we like it medium-well) by placing the entire grill pan in for 5 minutes.

Then I allowed the steak to rest on the cutting board for 10 minutes... Sliced & served with roasted broccoli mushrooms

The steak was delicious!!! So much flavor from the marinade! I highly recommend it. We'll be making this on the grill too. It is easy & doesn't take a lot of time. Thank you so much, Gianna!

Tuesday, April 26, 2011

Tex- Mexican "Lasagna", pre-Cinco de Mayo

This is a simple & fast weeknight dinner. I mean really simple. And really fast. The time is spent in the prep for me... Yesterday, while making my turkey meatloaf, I also baked the chicken. Then I wrapped & refrigerated it to be ready for tonight's meal. And as I also said yesterday, we're cutting more fat out of our diet so I've cut ingredients in it. But this is so versatile, you can add more salsa/spice/sour cream/smother it in cheese... it is really easy. OR you can use only refried beans & make it entirely vegetarian. And you have the ground turkey/beef/chicken option.

I can't believe next week is Cinco de Mayo already! I miss celebrating the holiday in Miami in little Cuba. So I have to bring some festiveness to my home.

Tex-Mex Lasagna

  • 8 Flour Tortillas
  • 1 lb. cooked, shredded Chicken*
  • 1/2 cup Salsa (I use Mild but any will do!)
  • 1/2 cup Sour Cream (Lowfat or regular)
  • 1 TBSp Cilantro or Parsley
  • 1 tsp Chili Powder (OR 1/2 tsp Chili Powder + 1/2 tsp cayenne pepper)
  • 1-2 cups shredded Cheese (I use the 2% milk, Mexican Mix)
  • 1 can of refried Beans (I use Vegetarian)

Preheat oven to 375 degrees. Spray a rectangular baking dish with cooking spray. Combine the chicken, salsa, sour cream & herbs in a bowl. Mix together. 


Form the "lasagna"- 
Layer 2 soft tortillas then spread 1/2 the chicken mix on them, then a little cheese. 
Layer 2 more tortillas, then spread refried beans on them, then some more cheese.
Layer 2 more tortillas, the rest of the chicken mixture on them, then more cheese.
Finally layer the last 2 tortillas on top & more cheese.


Bake for 20 minutes or until the cheese on top is melted & the sides of the tortillas have begun to brown. Serve topped with scallions & a dollop of sour cream or salsa. Delish & so very easy. 

*Lishie tip- For the Chicken, I spray a foil-covered baking pan with cooking spray, then using a pastry brush, coat the chicken with a little olive oil, coriander & S & P. Bake @ 375 degrees for 35-40 minutes. Shred. Or to be easier, get a rotisserie chicken & break it into pieces.

Also, salsa is a GREAT fat free, cholesterol free component to add flavor to a meal!

Monday, April 18, 2011

Recipe Swap! Chicken Salad, Theme: Paninis/Sandwiches

This week I hosted the recipe swap. And boy am I ever mad at myself! I was so consumed with my toddler's party that I didn't think about the fact that tonight (4/18/11) is the FIRST night of PASSOVER. So my Jewish friends are fasting from bread & leavened products & I choose to make paninis & sandwiches the topic? Dumb-me. I apologize to all of my Pesach following friends. I am very sorry. I will say that my recipe I am blogging here can be eaten alone OR on matzoh though! YUMMM, matzoh is so delish! We have a case of it in the house.

Mayo-y Goodness
Back to the blog... I got my friend Feisty again over at Tales From the Mad Men Kitchen! She supplied Emeril's Chicken Salad with Fresh Herbs from Food Network Magazine.

I was happy to make it since it is very close to how I make my own chicken salad. I followed Emeril's closely for this swap only making slight changes- I traded out the cayenne pepper for sweet paprika & I used half the mayonnaise.  And let's face it- Emeril's avocados are "optional" because it's doubtful they are even part of the recipe. Me thinks they are there to make the chicken salad look better. Because, no matter what way you pose it, it STILL looks like, well, my picture- Lumps of stuff covered in mayo ;)

Also I have to say I COMPLETELY disregarded the very first direction of "Rinse the chicken briefly under cool running water"! From everything I have read, this spreads the threat of salmonella more than not washing it! Just pat the chicken dry & carefully discard the paper towel. 

But, like I said, it's similar to my recipe- I roast my chicken fully with dry herbs de provence (for this, since it's "Fresh Herbs" I used Parsley & Dill) & I don't put in red onion... so when I asked my observant hubby what he thought of it, especially in comparison to mine, he said, "it's good. I can't remember how you make yours." Ummmm, thanks ;) Ha! I still like mine without the onion but this came in a good second!

Thank you Feisty for a change of pace! Oh I shared my Graceland Eggplant Panini. YUM. And this is my friend Kelly's, from Running Mama Cooks, take on it: Link.

Happy Pesach, my Jewish friends... And try this on Matzoh! You'll be happy :) And that is my Lishie tip.

Wednesday, April 13, 2011

Chicken Kabobs & Honey-Mustard Dip

Kabobs! Such an easy indoor or outdoor, healthy dish. I make mine all of the time on the grill pan but of course, as the weather gets nicer & nicer, outdoor grilling is wonderful. All you need is kabob sticks! These are so versatile- get your favorite veggies, ones that will grill nicely, & you can make these with chicken, beef or just veggie. An easy & quick meal!
Can you see the 1 piece of zucchini I slipped in? ;)


Chicken Kabobs

  • 2 lbs.boneless, skinless Chicken, cubed
  • 1 large Red Pepper, chopped in huge pieces
  • 1 large, Onion, hopped in huge pieces
  • Handful White, Button Mushrooms
  • Cooking Spray
  • Skewer Sticks

Alternately place onion/chicken/onion/peppper/mushrooms on the skewer stick (as much as can fit). Spray the grill pan... On Medium-high, grill each side for about 5-7 minutes, making sure the chicken is cooked. (To be safe, I finish the kabobs off in a 350 degree oven for 5 minutes.)

Serve with your favorite dipping sauce! Mine:

Honey-Mustard Dip
  • 1/4 cup Plain Yogurt
  • 1/4 cup Dijon Mustard
  • 2 TBSp Honey
  • 1 tsp Lemon Zest
  • 1/4 cup Lemon Juice
  • Freash Dill or Chives, finely chopped
  • Salt
Whisk all together, chill before serving.


*Lishie tips- Soak the skewer sticks in water for at least an hour before preparation to prevent them from burning. Also, I place the onion next to the meat for extra taste.

Cous Cous Primavera

Yesterday, April 12th, was "National Grill Cheese Day" & I made some Caprese Panini- Fresh mozzarella, basil & tomato with extra virgin olive oil & balsamic vinegar. YUM! But I wanted something on the side too, so I made a simple yet delish, cous cous primavera:

Grilled, fresh goodness!
Cous Cous Primavera
  • Cooking Spray
  • 1 Red Bell Pepper, thickly sliced
  • 1 Zucchini, sliced into coin shapes, then halved
  • 1 cup Water Or Chicken Stock
  • 1 cup Cous Cous
  • Zest & Juice of 1 Lemon
  • Freshly grated Parmesan Cheese

Using a oil-sprayed grill man on Medium-high heat, grill the zucchini & red pepper slices, about 2-3 minutes on each side.


In a sauce pan, bring the water (or stock) to a boil... turn off heat & add the cous cous. Cover for 5 minutes then fluff cous cous with a fork. Add lemon zest, grilled veggies & lemon juice. Toss lightly & top with grated parmesan cheese. 

Enjoy as a side or on on it's own! YUM.

Thursday, April 7, 2011

Chicken & Pierogi Paprikash

So, tonight, I did a little "Hungary meets Poland & they get married". I wanted to make a simplified Chicken Paprikash for a weeknight & I had freshly made (bought) pierogi. YUM. The whole thing took about 30 minutes to come together & it was tasty. Vegetarians, take note- You could actually make JUST the pierogi with this sauce, just omit the chicken steps. It was extremely flavorful & comforting. So good! The picture does NOT do it justice. Just trust me- it was delish!
I used skinless, boneless chicken breasts which allowed it to cook FAST. Here's what I did:
Creamy goodness!

Chicken & Peirogi Paprikash 
  • 1 lb. Chicken breasts (Skinless, boneless) *Can use more
  • S & P
  • 3 TBSp Unsalted Butter
  • 2 TBSp Olive Oil
  • 2 Large Onions
  • 2 TBSp Sweet Paprika (You can use a mixture of hot/smoked/sweet- your choice)
  • 12 Pierogi (13 oz package) *I use potato/cheese filled
  • 1 Cup Chicken Broth
  • 1/2 Cup Sour Cream
Salt & Pepper the uncooked chicken & set aside. Slice the onions.


Heat a large saute pan over Medium-High & melt 2 TBSp of butter. Brown the chicken on both sides, then take out of the pan & place in a dish. Set aside. 


Add the last TBSp butter & 2 TBSp olive oil to the pan. Saute the onions, stirring up the brown bits of chicken till the onions become soft & slightly brown, about 5 minutes. Add in the Paprika & stir till incorporated.


Add in the pierogi & allow them to brown- 2 minutes each side. Pour in the Chicken Broth, carefully stirring the onions & pierogi. Nestle the chicken pieces into the pan, on top of the pierogi/onion mixture. Cover & cook on low, simmering for about 20 minutes or until the chicken is cooked through.


When the chicken is done, remove it from the pan. Incorporate the sour cream into the pierogi/onion mixture. Then return the chicken to the pan & ladle sauce over it. ENJOY!

This was really delicious & I'll definitely be making it again!

*Lishie tip- Allow the sauce to cool a minute before adding sour cream. If you can, get fresh pierogi from a Polish grocery or make it! The frozen are just not the same.

Tuesday, April 5, 2011

A lighter Fettucine Alfredo

Cheesy goodness!
This is a super yummy recipe that comes together pretty fast on a week night. I compare the prep work & cook time to a stir fry- get everything ready... set... go... cook! And it's done in minutes. I love alfredo but I am not really suppose to eat heavy, creamy sauces, nor is my hubby. When I saw this recipe in Cooking Light Magazine, I had to try it. It is delicious.

I use the same ingredients but this is what I do:

Fettucine Alfredo Adapted from Cooking Light Magazine

  • 1 TBSp Butter
  • 2 Garlic Cloves, minced
  • 1 TBSp AP Flour
  • 1 & 1/3 cups Skim Milk
  • 5 oz. of Shredded Parmesan Cheese- *I buy the the 5 oz. tub of freshly shredded parmesan.
  • 2 TBSp Cream Cheese (I use regular)
  • *I OMIT the salt! The parm is salty enough for our taste, why add more?
  • 8 oz. FRESH packet of Fettucine

*I get the Buitoni- It tastes so much better than dry pasta & it's quicker to cook.

  • Fresh Parsley, chopped
  • Basil (sometimes I will add a chiffonade of basil)

*Lishie tip- Like I said, for weeknight cooking, it's all in the prep!


I get the water started for fettucine.  I get out the pan, & pat the butter into it but I do not turn the heat on... Instead, I line up everything else first. On a cutting board, I chop the parsley on one side. On the other side I ready (unskin) the garlic & place the microplane next to it. Grab my TBSp measure & scoop the flour, place the TBSp itself, with the flour in it on the cutting board as well. Grab my liquid measuring cup & pour the milk for the ready. Open the parmesan container... measure & slice the cream cheese... Open the pasta package... Ready, set... Turn on the stove flame & get ready to WHISK, WHISK, WHISK for 10 minutes... & have dinner in 15! The key is in the continuous whisking!

Oh & when the pasta's done cooking, do not use a colander! I transfer it directly from the water pot to the alfredo saucy pan with a pasta spoon & in this exchange, also bringing a teensy bit of the starchy water with it to the sauce.

This is really versatile too- it can be the main dish or a side... You can add a protein. I love to add grilled chicken.