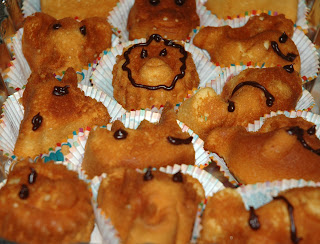
Saturday, June 30, 2012

Guppy Cuppies! Yellow Pudding Cupcakes

Guppy Cuppies!
Need something special for a little summer get together? Well, I have it! My friends & our children met up at a local Splash ground/playground & I thought a water-themed snack would be fun. Kids LOVE fun (duh). These are the cutest & easiest cupcakes... Even easier than the Turtle Pull-aparts (& they were easy too!) I got this idea from a Good Housekeeping article... see here.


Children, adults & squirrels alike, enjoyed these treats ;) (Gabriel felt the need to feed one to one of the park's squirrels when G thought the squirrel was eyeing his cheerios! LOL) 


I decided to fiddle with the yellow cupcake recipe & use some instant pudding & oil to make them moister for a hot, sunny day... they were, well, DeLish!


<3 Lishie

Guppy Cuppies
or

Yellow Pudding Cupcakes
  • 1 1/3 c flour
  • 1 package Instant Vanilla Pudding
  • 2 1/2 tsp baking powder
  • 1/2 tsp salt
  • 1/2 c butter, softened
  • 1/2 c canola oil
  • 1 1/4 c sugar
  • 3 eggs
  • 1 tsp vanilla
  • 2/3 c milk
Heat oven to 350°F. Place paper baking cups in each of 24 regular-size muffin cups.
In medium bowl, mix flour, pudding packet, baking powder & salt; set aside.
In large bowl, beat butter with electric mixer on medium speed 30 seconds. Gradually add sugar, about 1/4 cup at a time, beating well after each addition and scraping bowl occasionally. Add oil. Beat 2 minutes longer. Add eggs, one at a time, beating well after each addition. Beat in vanilla. On low speed, alternately add flour mixture, about one-third at a time,&  milk, about half at a time, beating just until blended.
Divide batter evenly among muffin cups, filling each with about 3 tablespoons batter or until about 2/3 full.
Frost with desired frosting.
Bake 20 to 25 minutes or until toothpick inserted in center comes out clean. Cool 5 minutes. Remove cupcakes from pans; place on cooling racks. 
Cool completely, about 30 minutes. 
Makes 24 cupcakes 


Desired Frosting ;) & decoration:

Vanilla Frosting
  • 1/2 c butter, softened
  • 4 c powdered sugar
  • 1/3 c milk
  • 1 tsp vanilla + blue food coloring!
Combine all ingredients together until smoothe. 
  • Goldfish crackers (I used the rainbow ones) & Confetti sprinkles.

Friday, June 29, 2012

Swap ~ Sandwiches

Another swap! I love these swaps (thank you to Sarah at Taste of Home Cooking as usual for hosting.)at his swap, I got to visit another new blog. And this week's swap? Sandwiches. So perfect! Summer for me is a mix of grilling, pasta & sandwiches.

Ammie, from Adventures in My Kitchen, Adapted this recipe from Rachel Ray. If you read my blog,you know I am not a big RR fan but I will take suggestions from other bloggers if they have put a RR recipe to the test! and funny thing? Ammie's changed RR's lime to tangerine... When I went shopping, I couldn't find the tangerines so I reverted to my favorite naval oranges. It is all citrus, right? (says the Floridian gal :) )


I grilled the chicken then shredded it, adding some sliced celery to the mix. Although it was a bit sweet for my taste, I enjoyed it!!! So it probably was better it was orange (tangerines are sweeter, right?)This is a great, summery meal. Thank you so much Ammie!


<3 Lishie

Grilled Honey Orange Chicken Sandwiches

adapted from Adventures in My Kitchen

  • 1 orange, juice & zest
  • 2 Tbsp honey
  • 1 tsp cumin
  • A handful cilantro, roughly chopped
  • 2 Tbsp olive oil
  • 2-4 boneless skinless chicken breasts
  • 1 tsp grill seasoning
  • Toppings of your choice, we used: Yummy tomatoes & celery slices
  • 4 rolls
In a medium bowl add  juice & zest of the orange, honey, cumin, cilantro and oil in a bowl and mix well.  Add chicken breast to bowl, stirring to coat well.  Set aside 15 minutes.

Heat grill or grill pan to medium high.  Place chicken on grill pan and cook for 4-5 minutes.  Flip and finish cooking on other side.  Be careful that you pan isn't too hot, and watch as these cook since the honey burns easily.

Once removed from the heat, let the chicken sit for a few minutes.  Then serve on rolls with your favorite toppings.

Wednesday, June 27, 2012

Chipotle-Orange Chicken Legs

~~~~PICTURE SHOULD BE HERE~~~~~


I am pretty irritated at myself. I normally do not forget to take pics of my food. It doesn't take me too long, hence the not so great pics ;) but tonight, with all of the rushing to get the food on the table, listening to my hubby tell me his cholesterol, after his Dr.'s visit today, is too high, etc. I forgot. If the dinner was just so/so I wouldn't blog it but it was GOOD.


I baked the chicken but grilling it would be so good too! The char would taste great. If you like citrus & some heat, try this. Just imagine how good it looked! ;)


<3 Lishie


Chipotle-Orange Chicken Legs
adapted from My Recipes
  • 1 c fresh orange juice, divided
  • 5 TBSp soy sauce, divided
  • 3 TBSp brown sugar
  • 2 TBSp olive oil
  • 6 garlic cloves, pressed
  • 1 TBSp orange zest
  • 1 1/2 tsp kosher salt
  • 1 tsp ground chipotle chile pepper
  • 2 lb chicken drumsticks (about 8 drumsticks)
  • 2 tsp brown sugar
  • 2 tsp cornstarch 
Preheat oven to 400° F.


Combine 1/4 c orange juice, 3 Tbsp. soy sauce, 3 Tbsp. brown sugar, &  next 5 ingredients in a shallow dish or large zip-top plastic freezer bag; add chicken. Cover or seal, & chill 10 minutes. Remove chicken from marinade, discarding marinade.


Bake chicken 40 minutes (until juices run clear); remove from oven; cover with aluminum foil, & let stand 10 minutes.


Meanwhile, whisk together 2 tsp. brown sugar, remaining 3/4 c orange juice, & 2 Tbsp. soy sauce in a small saucepan. Whisk together cornstarch & 2 tsp. water, & whisk into orange juice mixture. Bring mixture to a boil over medium heat, & cook, whisking constantly, 1 minute or until thickened. Brush sauce over chicken.

Monday, June 25, 2012

Birthday Cheesecake Bars


I am blessed with a wonderful student worker & her birthday's this week so I wanted to sprinkle a little celebration into our workspace with one of her favorite things- cheesecake. So I put on my thinking baking cap & made these bars. They traveled far easier than an actual cheesecake but retained the flavor & the fun! Happy happy birthday, Rachel!

<3 Lishie

Birthday Cheesecake Bars
  • 2 cups graham cracker crumbs
  • 1 stick butter, melted
  • 3/4 c sugar
  • 2 packages (8 oz. each cream cheese, softened)
  • 3/4 c sugar
  • 1 tsp vanilla
  • 2 eggs
  • Sprinkles- optional
Preheat oven to 350 degrees. Grease a 9x9" pan.

In a medium bowl, mix the graham crumbs, butter & sugar well. Pack it leveled, into the bottom of the baking pan.

Using a mixer, combine the cream cheese, sugar, vanilla & eggs (one at a time) until smooth & fluffy. Pour onto the graham cracker base & level.

Sprinkle on the sprinkles!!!

Bake for 50 minutes, until the edges are browned. Allow to cool before cutting. Serve in bars.

Wednesday, June 20, 2012

Easiest Pasta and Broccoli Recipe


My hubby is not one for veggies much either. And I love them. So when he decides to have steak, I make what I want for me & G... I wanted broccoli this week. So I made a ton of this great, "Easiest Pasta & Broccoli" Recipe from Skinnytaste to eat 2 days straight. Yep. And it is GOOD. Make it- it is kid-friendly & Lishie-friendly (same thing ;) )


<3 Lishie

Easiest Pasta and Broccoli Recipe

from Skinnytaste (Gina's Skinny Recipes)

  • 12 oz uncooked pasta (I used capellini broken up into little pieces...)
  • 6 1/2 cups fresh broccoli florets, no stems
  • 5 cloves garlic, smashed and chopped
  • 1/4 cup grated Parmesan or Romano
  • 2 tbsp olive oil, divided
  • salt and fresh cracked pepper
Bring a large pot of salted water to a boil. When water boils, add pasta & broccoli at the same time & cook according to pasta instructions for al dente. When pasta is almost done cooking, reserve about 1 cup of the pasta water & set aside. Drain pasta & broccoli.

Return the pot to the stove & set heat to high; add 1 tbsp olive oil, when hot, addgarlic. Cook until golden, reduce flame to low & add pasta back to the pot.

Mix well, add remaining olive oil, grated cheese, salt & pepper to taste mixing well & smashing any large pieces of broccoli to break up.

Add 1/2 cup of reserved pasta water & mix well adding more if needed.

Serve in pasta bowls with additional grated cheese on the side.

Tuesday, June 19, 2012

Red, White & Blue Mini-Trifle

My Dad-in-Law loves simple, fresh desserts & since it was just us (my hubby, our toddler) & Pop for Father's Day, I went with this easy fruit trifle. Fresh blueberries, strawberries, pound cake pieces & real whipped cream. Happy dad's day indeed! <3 Lishie

Red, White & Blue Mini Trifle
  • butter pound cake
  • strawberries
  • 1-2 tsp sugar
  • 1 TBSp lemon juice
  • blueberries
  • heavy whipping cream
Prep the layers:
Cut up cake into tiny square pieces; set aside.
Clean & core the strawberries. Slice into pieces & sprinkle the sugar & lemon juice on them; set aside.
Clean/destem the blueberries; set aside.
Whipped cream: 1 c heavy cream, 1 tsp Vanilla & 2 TBSp sugar
Beat the cream on high, slowly adding the vanilla, then sugar & continue to beat until thick & fluffy; set aside.
 
Layer:
Layer the pound cake/strawberries/whipped cream/pound cake/whipped cream/blueberries. 

For a yummy variation, try balsamic, macerated strawberries!

Monday, June 18, 2012

Zoo Anmals


Fishie
I am a sucker for cute baking pans! And the cuter, the better... So I picked up the NordicWare Pro Cast Zoo Animal Muffin Pan. It is ADORBS. Especially for the little ones. I made these Turtle Pull-Apart Cupcakes for Gabriel's last school day & also these Vanilla Zoo Animals for the kids who do not like frosting (yes, children like that exist ;) ) . These are DeLish! Even our cat Pesto helped himself to one (unfortunately, Gabriel's Monkey! LOL...

<3 Lishie
Monkey

Vanilla Zoo Animals
from the Nordicware Package:

  • 2 & 1/4 c flour
  • 1 & 2/3 c sugar
  • 2 tsp baking powder
  • 3/ tsp baking soda
  • 1/2 tsp salt
  • 1 c butter, softened
  • 1 c vanilla yogurt
  • 4 eggs
  • What other animals do you spot?
  • 2 tsp vanilla
Pre-heat oven to 350 F.
Prep & grease the cakelet pan; set aside.

In a medium bowl, stir together flour, sugar, baking powder, baking soda & salt; set aside.

In a large mixing bowl, add butter, yogurt, eggs & vanilla. Gradually add flour mixture, scraping down the sides of the bowl. Beat until incorporated. Spoon batter into prepped pan, filling cups 2/3 full (batter WILL rise!). Make sure batter is evenly spread into all of the design crevices!!!
Bake 18-20 minutes until a toothpick inserted comes out clean. Remove from heat & allow to cool, in pan 10 minutes. Invert cakes onto cooling rack & cool completely. Takes this cooling time to quickly wipe out the pan, then refill & repeat...  When the second batch is done & cooling, AGAIN, take this cooling time to quickly wipe & wash out the pan (you'll thank me for this tip!!!) 
Decorate as desired. I used a few dollops of chocolate icing! It was the perfect amount. But I'd also sprinkle with confectioner's sugar or decorate completely with icing too!

Hershey's "PERFECTLY CHOCOLATE" CHOCOLATE FROSTING
  • 1/2 cup (1 stick) butter or margarine
  • 2/3 cup HERSHEY'S Cocoa
  • 3 cups powdered sugar
  • 1/3 cup milk
  • 1 teaspoon vanilla extract
Melt butter. Stir in cocoa. Alternately add powdered sugar and milk, beating to spreading consistency.
Add small amount additional milk, if needed. Stir in vanilla. About 2 cups frosting.  

Saturday, June 16, 2012

Turtle Pull-Apart Cupcakes

Betty Crocker's Inspiration
I LOVE making fun stuff but I am not very good at decorating... so the best time to make fun things is for children! They are very sweet & overlook imperfections, especially... Pre-K 3 year olds. I got the original idea from Betty Crocker ... here. Since this was for a classroom, end of year celebration, I aimed to make it more pull-apart, hand friendly & less messy, I hope! It came out really cute if I do say so myself!
<3 Momma Lishie

Yellow Cupcakes

  • 2 1/3 c flour
  • 2 1/2 tsp baking powder
  • 1/2 tsp salt
  • 1 c butter, softened
  • 1 1/4 c sugar
  • 3 eggs
  • 1 tsp vanilla
  • 2/3 c milk
Heat oven to 350°F. Place paper baking cups in each of 24 regular-size muffin cups.
In medium bowl, mix flour, baking powder & salt; set aside.
In large bowl, beat butter with electric mixer on medium speed 30 seconds. Gradually add sugar, about 1/4 cup at a time, beating well after each addition and scraping bowl occasionally. Beat 2 minutes longer. Add eggs, one at a time, beating well after each addition. Beat in vanilla. On low speed, alternately add flour mixture, about one-third at a time,&  milk, about half at a time, beating just until blended.
Divide batter evenly among muffin cups, filling each with about 3 tablespoons batter or until about 2/3 full.
Frost with desired frosting.
Bake 20 to 25 minutes or until toothpick inserted in center comes out clean. Cool 5 minutes. Remove cupcakes from pans; place on cooling racks. 
Cool completely, about 30 minutes. 
Makes 24 cupcakes 


Desired Frosting ;):

Vanilla Frosting

  • 1/2 c butter, softened
  • 4 c powdered sugar
  • 1/3 c milk
  • 1 tsp vanilla + green food coloring!
Combine all ingredients together until smoothe. 


~AND~


Hershey's "PERFECTLY CHOCOLATE" CHOCOLATE FROSTING
  • 1/2 cup (1 stick) butter or margarine
  • 2/3 cup HERSHEY'S Cocoa
  • 3 cups powdered sugar
  • 1/3 cup milk
  • 1 teaspoon vanilla extract
Melt butter. Stir in cocoa. Alternately add powdered sugar and milk, beating to spreading consistency.
Add small amount additional milk, if needed. Stir in vanilla. About 2 cups frosting. 


Wilton Plastic Candy Bottles
DECORATING TIME!


Tail= One Nilla Wafer chocolate-frosted.
Tops of cupcakes= frosted the normal way- I use an off-set cake spatula.
Here is where I have my deocorating life-saver!
Face (eyes, nostrils, mouth) & toes= Used a candy decorating bottle (pictured, left <---)
"Shell" outline- also used candy decorator 


Friday, June 15, 2012

Swap! Blogger's Choice


I LOVE the Blogger's Choice Swaps! Love. I get to peruse a blog I may not have known or a friend's blog. Here, I was introduced to Jenni of  DoughSeeDough. How cute is her blog name?!? Adorbs. I love her healthier choices. And I had a hard time weening my choice to one! But I did... & I have filed away a couple of others in my brain to do soon! If I had more time, I'd be blogging a lot more.

Now I love Tex Mex food but my hubby does not. And I love beans, he does not. So I rarely make either at home. I took advantage of the swap to make the Copy Cat Burrito Bowl. I love Chipotle too much. I could eat it every day. And I alternate between the burrito & the bowl... I used Jenni's seasonings (yummmmmmmmm) & my usual burrito bowl choices for this one. And went vegetarian but I do also enjoy shredded pork or grilled chicken! I will make it again... & again. And I was sooooooooo happy!

Oh, one more thing... I cannot have brown rice so, to make it healthier for me, I swiped it out for white. 

<3 Lishie

Copy Cat Burrito Bowl
adapted from doughseedough
  • 3 cups white rice
  • 1 lime, zested & juiced
  • 1/2 cup cilantro, roughly chopped, divided
  • 1/2 teaspoon chili powder
  • 1/2 teaspoon onion powder
  • 1/2 teaspoon garlic powder
  • 1/2 teaspoon cumin
  • 1/2 teaspoon oregano
  • 1 teaspoon olive oil
  • salt & pepper, to taste
  • 1 can black beans, drained & rinsed
  • 1/2 cup reduced fat cheddar cheese, shredded
Other optional toppings:
  • Sour cream (check!)
  • Jalapeños
  • Avocado
  • Queso
  • Hot sauce
  1. Cook rice according to package directions. I use a rice cooker & use a 1 cup rice: 2 cups water ratio. When rice is cooked, mix with 1/4 cup cilantro, lime zest and lime juice.
  2. Meanwhile, mix chili powder, onion powder, garlic powder, cumin, & oregano together & sprinkle generously over beans.
  3. In a separate bowl, make the pico de gallo. Combine tomatoes, 1/4 cup cilantro, red onion, salt & pepper. Toss to combine.
  4. To assemble: place rice in bowl and top with black beans, shredded cheese, & any other toppings you desire. Enjoy!

Thursday, June 14, 2012

Bacon

Christina, from Tales from a Madmen Kitchen told me about baking bacon when we breakfasted for NYE dinner at her home. Less grease, less mess & good tasting bacon! Despite the picture, the bacon was delish- it was just fatty ;)

Baked Bacon
Preheat oven to 400 degrees F.
Line a rimmed baking sheet with foil & a roasting rack (not necessary though but if you use the rack, spray it with cooking oil). Bake for 15-20 minutes.

We used the bacon on our French Bread Pizza one night & another night, we had BLTs.
<3 Lishie

Wednesday, June 13, 2012

Book Expo America~ NYC


Book Expo how I love thee... It is suppose to be work, shhhh... But I find it so fun! How can I not? I LOVE books!!! And Book Expo is the Trade Book Industry's EVENT. THE event. I have blogged about the Childrens book experience I had on art with an archangel... Now I will tell you about the food-type book experiences I had...


Carla.

She was just there. Yes, Chef Carla Hall from Top Chef & The Chew just came by to see what was going on. She was adorable & tall. So very tall) of course I am so short at 4'10" but...) What a sweet, fun person!
 
Some of her friends were at BEA too- TLC's Stacy London, HGTV's Sabrina Soto, Bravo's Tim Gunn...

 
America's Test Kitchen.

Now... I have spoken of my love before for ATK...And my experiences at Book Expo with them :) 


The year before that I got: ATK Best Lost Recipes

This year I got:

And I am ecstatic! Cannot wait to get a chance to peruse it (I mean devour it...) And start bookmarking!!!
They truly are amazing & you cannot go wrong with their recipes.


Some other things to report:
Ok, so Rachel Ray was also there but I was not about to stand in line forever (sorry) for a book I'd probably not use (sorry) especially when she wasn't taking pictures (why? have to ask her) RR was promoting her book, The Book of Burger... And fellow blogger Bakerella was there. I got her autograph but because everything was signed by her. She makes gorgeous Cake pops & she was promoting her book, Cake Pops Holidays. 


And I got a chance to peruse/meet many fiction & other non-fiction writers. BEA is a book-lover's dream! I very much enjoyed myself indeed! <3 Lishie

Tuesday, June 12, 2012

Banana Crumb Muffins

We had a few overripe bananas & it gave me a wonderful excuse to bake up something yummy. I had spied these delicious muffins & had them bookmarked in my head to bake. Oh.my.goodness. DeLish indeed!

<3 Lishie

Banana Crumb Muffins
from Baby Loving Mama
  • 1 1/2 cups all-purpose flour
  • 1 teaspoon baking soda
  • 1 teaspoon baking powder
  • 1/2 teaspoon salt
  • 3 bananas, mashed
  • 3/4 cup white sugar
  • 1 egg, lightly beaten
  • 1/3 cup butter, melted
  • 1/3 cup packed brown sugar
  • 2 tablespoons all-purpose flour
  • 1/8 teaspoon ground cinnamon
  • 1 tablespoon butter
Preheat oven to 375 degrees. Lightly grease 12 muffin cups or line with muffin papers.
 
Combine 1 1/2 cups flour, baking soda, baking powder & salt in large bowl.
 
In separate bowl beat or whisk together bananas, sugar, egg & melted butter.
Stir banana mixture into the flour mixture just until moistened. Do not over stir! (The is the key to great muffins is to not over mix!)
 
Spoon batter into prepared muffin cups.
 
In a small bowl, mix together brown sugar, 2 tablespoons flour & cinnamon. Cut in 1 tablespoon butter with a fork until mixture is coarse crumbs. Sprinkle over muffins.
 
Bake for 18 to 20 minutes or until a toothpick inserted into center of a muffin comes out clean.

Monday, June 11, 2012

French Bread Pizza

Sometimes, the simplest things can be the very best.
<3 Lishie
French Bread Pizza 
  • 2 loaves of French Bread (can be a day old!)  
  • 2 cups marinara 
  • 2 cups shredded mozzarella 
  • fresh basil, torn 
  • toppings (optional~ hubby wanted bacon!)
the "Before"
Preheat the oven to 375 degrees. Prep a pizza stone or line a baking sheet with lightly greased aluminum foil.
 
Slice the bread loaves in half length-wise & place on the prepped cooking sheet. Scoop out some of the softer bread inside to make room for the toppings. Ladle, directly in the middle, equal amounts of sauce on each slice.Sprinkle the shredded mozzarella generously over all four slices. Add the basil & any favorite toppings.

Bake for 15 minutes or until the cheese is yummily melted. Enjoy!

Tuesday, June 5, 2012

Cilantro Lime Rice


I love rice as much as I do pasta. And it is crohns friendly for me so I usually load up on it & have a little bit of the protein veg... more of the rice. This is my copycat version of Chipotle's Cilantro-Lime Rice. It is delicious as a side or in a burrito, etc.

<3 Lishie

Cilantro-Lime Rice

  • 1 cup short-grain rice
  • 2 & 1/4 cups water
  • 2 TBSp butter
  • zest & juice of 1-2 limes
  • 1 tsp sea salt
  • 1/4 cup cilantro
Cook the rice (I use a rice maker but you can combine the rice & the water on medium-high heat until it is boiling. Lower to a simmer & cover. Cook for about 20 munutes or until the water is evaporated. Fluff the rice... Add the butter & allow it to melt, incorporating it into the rice. Add the lime zest & juice, salt & cilantro. Fluff & serve. Enjoy!

Monday, June 4, 2012

Pudding Pops

Remember these? Anyone, anyone? Bueller? I am back down memory lane in Nostalgiaville. Problem is, how did the 80s become "retro"? Whoa. E.T.is 30 & I saw it (ready?) in.the.theater. Well whatever happened to Pudding Pops? You know, Mr. Cosby pushed them in the adverts? I loved them. We loved them.

Floating around the 2000's Pinterest is a "recipe" for "Hello Summer!" ha ha... Basically, pudding "type" pops. Well, I took the idea & ran with it doing it my way And what I created tasted EXACTLY like delightfully refreshing, awesomely cold, creamy NOSTALGIA. These tasted as if I had just gone Back to the Future. Funny thing too? The Space Shuttle Enterprise was making its way through my town's waterway on the same day I made these, headed to the Intrepid Sea, Air & Space Museum to dock.

<3 Lishie

Pudding Pops
  • 1 package of Pudding
  • 1 & 1/2 c milk
  • 1/2 cup melted marshmallows OR Fluff
Whisk the pudding mix into the milk until it is dissolved. Microwave for 5 to 6 minutes ( whisking every 2 minutes) until the pudding is boiling. Fold in the melted marshmallow.

Allow to cool a little bit & then place into freezer Popsicle molds. When frozen, enjoy!